
Webhooks
Last updated
Send events from any external system into your Ploy workspace, write them to PloyDB, and trigger Ploybooks automatically.
Ploy webhooks are inbound: external systems (Clay, Stripe, Zapier, your own backend, partner APIs) POST events to a per-endpoint URL in your workspace. Each accepted event is stored, searchable, and can optionally run a Ploybook with the event payload as prompt context.
How It Works
- Create an endpoint in Workspace Settings → Webhooks. Ploy mints an ingest URL and an API key.
- Configure the sender (Clay, Stripe, your backend) to POST JSON to the ingest URL with your API key in the
Authorizationheader. - (Optional) Wire a Ploybook trigger so every accepted event runs a workflow with the payload as context.
- Inspect events in the dashboard or by asking Ploy's Agent — every received event is stored with its full payload.
Tip: Endpoints are scoped to a workspace, not a site — one endpoint can drive workflows that touch multiple sites.
Creating an Endpoint
- Open Workspace Settings → Webhooks.
- Choose Create webhook, add an optional description (for example Clay enrichment or Stripe events), then choose Create.
- Ploy shows the ingest URL and the API key once. Copy both, then choose I've copied the key. If you lose the key, open the endpoint and choose Rotate key.
- Copy the ingest URL. It has the shape:
https://ploy.ai/api/v1/webhook/{endpointSlug}
Authentication
Send the API key as a bearer token in the Authorization header on every request:
Authorization: Bearer {apiKey}- Requests without a valid key are rejected with
401 Unauthorized. - Keys are scoped to a single endpoint. Rotating a key invalidates the old key immediately. Disabling an endpoint stops it from accepting events; its key works again when you enable it.
- Treat keys like passwords. Store them in your sender's secret manager — never commit them to source control.
Sending Events
Send an HTTP POST with a JSON body to the ingest URL:
curl -X POST https://ploy.ai/api/v1/webhook/ENDPOINT_SLUG \
  -H "Authorization: Bearer YOUR_API_KEY" \
  -H "Content-Type: application/json" \
  -d '{
    "event": "lead.enriched",
    "email": "alex@acme.com",
    "company": "Acme Inc.",
    "title": "VP Marketing"
  }'
Request Format
| Field | Requirement |
|---|---|
| Method | POST only. |
| Content-Type | application/json. Other content types are rejected with 415. |
| Body | Any well-formed JSON object. Schema is up to you — Ploy stores the payload verbatim. |
| Payload size | Up to 1 MB, or up to 128 KB if the endpoint writes to a table. Larger payloads return 413 Payload Too Large. |
| Auth | Authorization: Bearer {apiKey} required on every request. |
Response Codes
| Status | Meaning |
|---|---|
| 200 OK | Event stored. The response body is {"event_id": "..."}. If a Ploybook trigger or table is connected, it runs after the response. |
| 401 Unauthorized | Missing or invalid Authorization header, or a key that was rotated. |
| 403 Forbidden | The API key belongs to a different endpoint. |
| 404 Not Found | The endpoint does not exist, was deleted, or is disabled. |
| 413 Payload Too Large | Body exceeds 1 MB, or 128 KB when the endpoint writes to a table. |
| 415 Unsupported Media Type | Content-Type is not application/json. |
| 429 Too Many Requests | More than 60 requests per minute with this key. Back off and retry. |
If the body is not valid JSON, Ploy still stores the raw body and returns 200, but Ploybooks and tables cannot read fields from it. Send valid JSON.
Sender Retry Guidance
Ploy returns 200 OK as soon as the event is stored. If you get a non-2xx response, the event wasnot stored — your sender should retry with exponential backoff. Most sources (Clay, Stripe, Zapier) handle this automatically. For custom backends, retry on 5xx and 429 with jitter; do not retry on 4xx other than 429.
Triggering a Ploybook
The most powerful pattern is wiring an endpoint to a Ploybook. Every accepted event runs the Ploybook with the payload injected as prompt context — so a webhook becomes a workflow trigger.
- Create the Ploybook you want to run (e.g.
Generate ABM page for prospect). - In Workspace Settings → Webhooks, open the endpoint and set Trigger ploybook to your Ploybook. Only workspace Ploybooks are listed.
- Each future event runs that Ploybook in the background. To stop, choose No ploybook trigger.
Writing Webhook Data to a PloyDB Table
A webhook endpoint stores every accepted event in webhook history. To also create or update a record in a PloyDB table, connect the endpoint to a Ploybook that validates the payload and writes the mapped values to the table.
- Create a webhook. Go to the workspace settings page for Webhooks and either create a webhook or select an existing one.
- Copy the curl command below and update it based on the data you plan on mapping:
curl -X POST "https://ploy.ai/api/v1/webhook/[webhook_id]" \ -H "Authorization: Bearer [webhook api key]" \ -H "Content-Type: application/json" \ --data '{"hello":"world"}' - Send one test event using the curl command with a realistic shape of data. Confirm the webhook accepts the event before connecting it to PloyDB.
- Attach the webhook to the PloyDB instance you created. Open the webhook in Workspace Settings → Webhooks and select the PloyDB instance as its destination.
- Send another test event. Run the updated curl command again to ensure everything is working properly, then open PloyDB and confirm that the expected data exists in the table.
{
  "event": "lead.created",
  "event_id": "evt_01JABC123",
  "email": "alex@acme.com",
  "company": "Acme Inc.",
  "title": "VP Marketing",
  "received_at": "<ISO 8601 timestamp>"
}| Payload field | PloyDB column | Write behavior |
|---|---|---|
event_id | Event ID | Use as the unique match key for an upsert. |
email | Validate before writing. | |
company | Company | Write as text. |
title | Title | Write as text when present. |
received_at | Received at | Write as a date and time. |
Keep credentials out of the payload. The external sender only needs the webhook endpoint's API key; Ploy handles the connection to the attached PloyDB instance.
Example: Clay Enrichment → ABM Landing Page
A high-leverage setup: Clay enriches a list of target accounts, posts each enriched row to Ploy, and Ploy runs a Ploybook that generates a personalized ABM landing page for the prospect — pre-loaded with their company name, industry, and pain points. Drop the URL into your outbound sequence so every prospect lands on a page built for them.
1. Create the endpoint
In Workspace Settings → Webhooks, create an endpoint described as Clay enrichment. Copy the URL and key.
2. Configure Clay
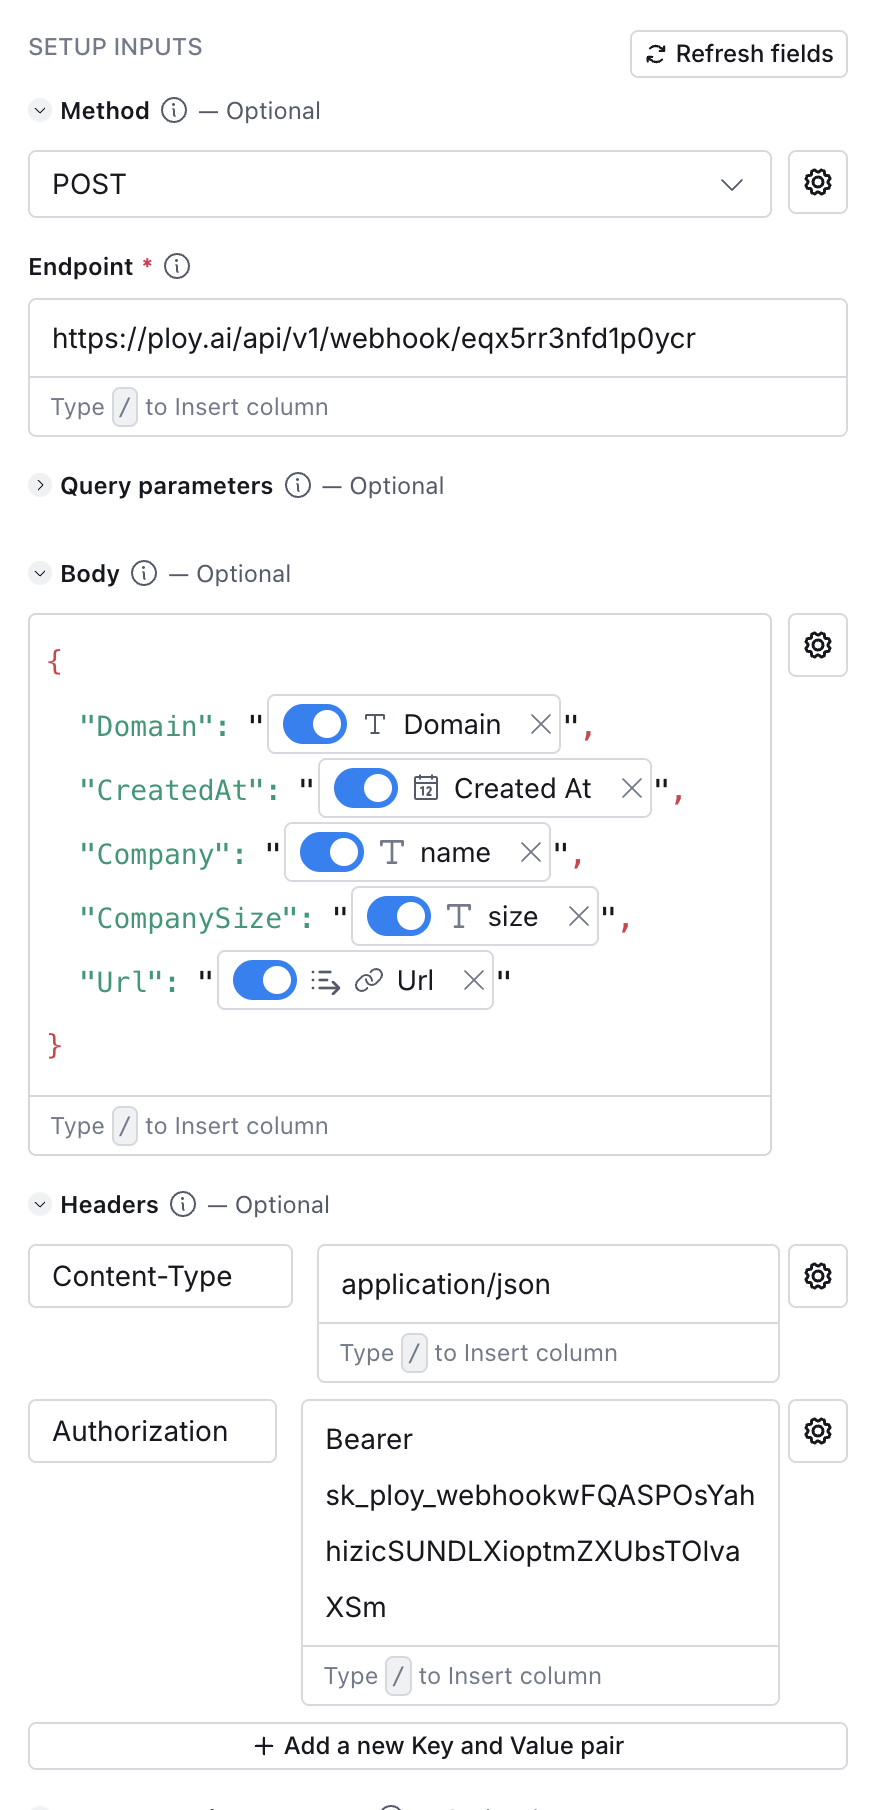
In your Clay table, add an HTTP API action:
- Method:
POST - URL:
https://ploy.ai/api/v1/webhook/{endpointSlug} - Headers:
Authorization: Bearer YOUR_API_KEY·Content-Type: application/json - Body: a JSON object referencing Clay's enriched columns. Press / inside the Body field to open Clay's column picker and insert the right field — Clay wraps each one in a typed token so the value flows through on every run.
{
  "event": "clay.account_enriched",
  "company": "{{company}}",
  "company_domain": "{{domain}}",
  "industry": "{{industry}}",
  "headcount": "{{headcount}}",
  "tech_stack": "{{tech_stack}}",
  "recent_news": "{{recent_news}}",
  "primary_contact_first_name": "{{first_name}}",
  "primary_contact_title": "{{title}}"
}
3. Wire the Ploybook
Build a Ploybook called Generate ABM page for prospect with steps like: clone your ABM page template → rewrite the hero, value props, and social proof to match the prospect's industry and recent news → publish at a unique slug like /for/{company-slug} → return the URL. Set this Ploybook as the trigger on the Clay endpoint.
4. Run Clay & sequence the URL
Each row Clay sends fires the Ploybook with the full payload as context. Pages publish within a couple of minutes — write the published URL back to a Clay column, then reference it in your outbound copy (e.g. {{abm_page_url}}) so every prospect clicks through to a page built for them.
Inspecting Received Events
Every accepted event is stored with its full payload, timestamp, and source endpoint. You can:
- Browse events in Workspace Settings → Webhooks → Events — filter by endpoint, time range, or substring search across the payload.
- Expand an event to see its JSON body. To see the run it started, open the Ploybook and check Run History; runs started by a webhook show a Webhook label.
- Ask Ploy's Agent — "Show me the last 10 events on the Clay endpoint" or "Find webhook events containing alex@acme.com." Ploy's Agent queries event history directly.
Pausing & Rotating Endpoints
- Pause: disable an endpoint to stop accepting events immediately. Senders receive 404 Not Found. Re-enable any time.
- Resume — Re-enables event acceptance. Existing API keys stay valid.
- Rotate key: open the endpoint and choose Rotate key. Ploy shows a new key once. The old key stops working immediately and the URL stays the same, so update the sender's Authorization header.
- Delete: the URL stops accepting requests and the API key is revoked. Past events stay visible in the Events tab. You cannot undo this.
Limits & Behavior
| Property | Value |
|---|---|
| Payload size | 1 MB max per request, or 128 KB when the endpoint writes to a table. |
| Content type | application/json only. |
| Methods | POST only. |
| Auth | Authorization: Bearer {apiKey} required on every request. |
| Storage | Every accepted event is stored with its full payload, timestamp, and endpoint. |
| Ploybook execution | Runs after 200 OK is returned. See the run and any error in the Ploybook's Run History. |
| Retries | Sender-driven. Ploy does not retry inbound events — your sender should retry on 5xx and 429. |
| Rate limit | 60 requests per minute per API key. |
Troubleshooting
401 Unauthorized— Check theAuthorizationheader. It must beBearer {apiKey}with a single space and no quotes around the key.- 403 Forbidden: the API key belongs to a different endpoint. Use the key that was created for this endpoint.
- 404 Not Found: the endpoint doesn't exist, was deleted, or is disabled. Confirm the URL matches the endpoint page and that the endpoint is enabled.
413 Payload Too Large— Trim the body below 1 MB. For bulk loads, send one event per row instead of batching.415 Unsupported Media Type— SetContent-Type: application/json. Form-encoded and multipart bodies are not accepted.- Ploybook didn't run: confirm the trigger is set on the endpoint, the Ploybook's required integrations are connected, and your organization has AI credits. Check the Ploybook's Run History for the run and any error.
- Lost the API key: open the endpoint, choose Rotate key, and update the sender with the new key.
What's Next?
- Store structured records — Read the PloyDB guide to create tables and manage the records your webhook workflow writes.
- Build the workflow — Read the Ploy's Agent & Ploybooks guide to design the Ploybook your endpoint will trigger.
- Connect more tools — See the Integrations directory for first-class connections (HubSpot, Notion, GitHub, and more).
- Review security — How Ploy protects your data is covered in Security & Compliance.
- Get help — Check the FAQ & Troubleshooting page or email support@ploy.ai.