
Publishing & Deploys
Last updated
Ship your site, manage versions, and go live on a custom domain.
When you're ready to make your site public, Ploy handles publishing, hosting, SSL, and CDN delivery. Every publish is a complete snapshot of your site. To go back to an earlier version, restore it from Versions in the editor, then publish again.
How Publishing Works
- Build — When you click Publish (or ask Ploy's Agent to publish), Ploy builds your site into optimized static assets.
- Deploy — The build is deployed to Ploy's global hosting infrastructure.
- Live — Your site is immediately available at its Ploy URL (and your custom domain, if configured).
Every deploy is a snapshot — a complete, immutable version of your site at that point in time.
Typical deploy time: A few seconds for most sites.
Publish your site
Select Publish.
- If your site has never been published, choose your site address and select Continue. Add a title, description, favicon, and share image, and select Continue. Then choose where to publish: Production (your live site), Preview (a separate review address), or both, and select Publish. If Ploy's Agent already published your first page, these steps are skipped. Select the gear to change the address or the site details.
- Later, select Publish, choose the targets, and select Publish.
- Select the gear to change the address, the site details, or automatic publishing.
- While a publish runs, the Publish button shows Publishing, even after you close the panel. On a phone, the panel opens as a sheet with the main button at the bottom.
- To open your published site on a phone, select Publish, then the QR code button next to the Production or Preview address, and scan the code with your phone's camera. It opens the page you are on. On a computer, point to the address to show the button. The button appears once that target is published. For a custom domain, it appears after the domain is live.
Change your site address
Your site gets a free address ending in ploy.build. To change it, select Publish, then the gear, then Domains, and edit Site address. Your Preview address updates to match. The change takes effect immediately and the old address stops working, so update any links you shared. Only owners and admins can change it, and only while the site has no custom domain. After you connect a custom domain, manage domains in Hosting instead.
Made by Ploy badge
On the Free plan, pages on your ploy.build Production and Preview addresses show a small Made by Ploy badge. Paid plans (Starter, Pro, and Enterprise) hide it. The badge never appears on a custom domain.
The badge updates when you publish to Production. After you upgrade, or if a paid plan ends, publish to Production again to apply the change.
Unpublish
Select Publish, then the gear, then Unpublish. Your site is replaced with an offline page until you publish again. Nothing is deleted.
Publishing paused
- If the panel shows Publishing paused, read the sentence under it rather than repeatedly clicking Publish. It tells you why nothing was published, for example that your latest edits have not finished saving.
- Choose Fix to ask Ploy to address the issue. Fix does not publish your site.
- Once the issue is resolved, choose Publish again yourself.
- Confirm that publishing finishes, then open the public site and check the affected pages.
- If the warning remains, use Help & support. Do not treat an earlier attempt as a successful publish.
Review a failed publish
If a publish fails, the publishing panel shows Publish failed with two actions: Fix and Publish again. One sentence explains what went wrong. For a code error, it names the file and line.
- Select Show details to read the reason. Select Full output in the details if you need the complete log. If there are several issues, select the issue count to see each one.
- Choose Fix to ask Ploy to repair the issue in a chat. Check the chat before you publish. Fix does not publish your site.
- If you fixed the issue yourself, or the failure looks temporary, choose Publish again.
- If the same code error would happen again, Ploy asks you to confirm before it publishes the same code. Choose Publish anyway only if you fixed the issue somewhere else.
- If you do not have enough credits for a repair, Manage credits takes the place of Fix. You can still fix the site yourself, then publish again.
- Confirm the publish completes, then check the affected public pages.
Automatic Publishing
Give Ploy standing permission to publish site changes without asking you to click Publish each time. Automatic publishing is configured per site and is off by default.
One exception: when automatic publishing is off and your site has never been published, Ploy's Agent can publish your first page to Production and Preview without asking. It happens once per site, and unpublishing does not make it happen again. After that, every publish follows the setting below, or waits for you to select Publish. Only owners and admins can trigger this first publish.
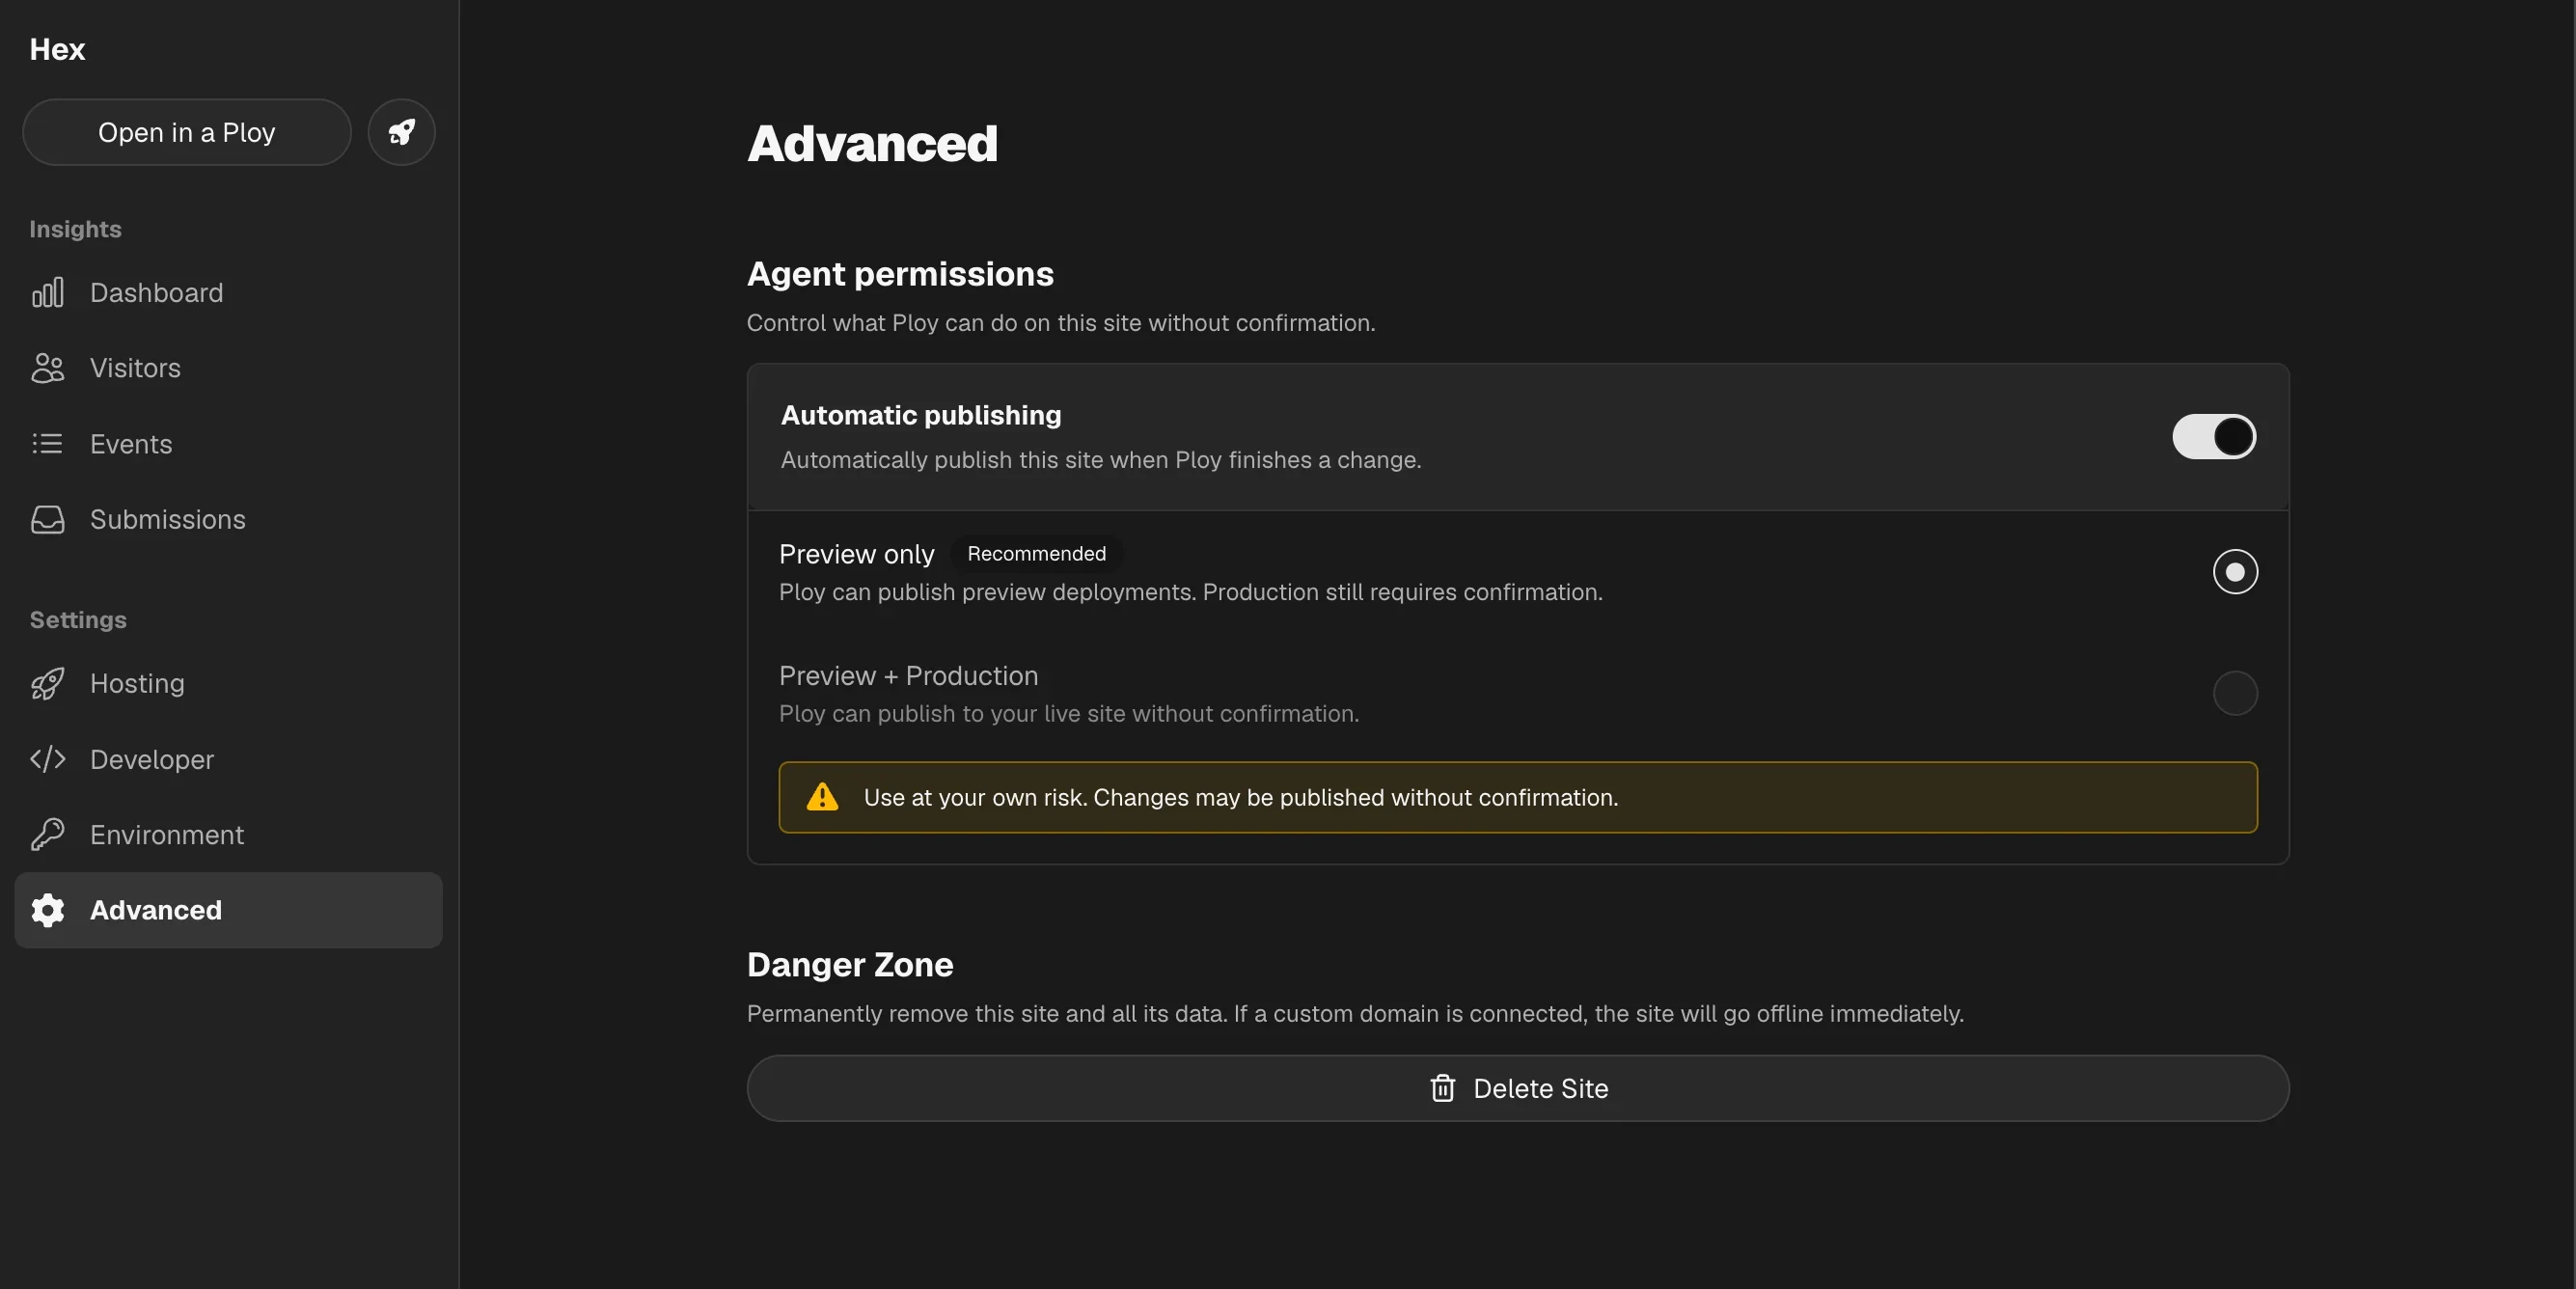
Configure automatic publishing
- Open the site dashboard and go to Advanced.
- Turn on Automatic publishing.
- Choose the publishing scope you want to allow.
- Preview only
 Recommended — Ploy can publish preview deployments automatically. Publishing to production still requires your confirmation.
 - Preview + Production — Ploy can publish preview deployments and your live site without an additional confirmation. Use this option only when you are comfortable giving Ploy that level of publishing autonomy.
You can turn automatic publishing off at any time from Advanced. Changing the scope for production uses Ploy's existing confirmation step-up flow.
What to expect
- Automatic publishing is limited to the targets allowed by the scope you selected. If a change needs a higher permission level, Ploy falls back to the regular manual Publish flow.
- While a publish is running, the status card shows the state of each target. Use the gear icon on the card to review or edit the permission in Advanced.
- Only one publish operation can run at a time. If another publish is already in progress, wait for it to finish before retrying.
Schedule a future production publish
A scheduled Ploybook can prepare a production publish or publish at its scheduled run time when that action is part of the workflow. The schedule itself does not make every run publish automatically.
Before scheduling a Ploybook that should publish to production, an owner or admin must open the site and allow automatic publishing to production in Site → Advanced. If production automatic publishing is not enabled when the scheduled run reaches the publish step, the run must stop for a manual publish instead.
Review a staging-only page
For a page that needs review before it goes live:
- Use a test path such as
/test/slug. - Add a
noindexdirective so search engines do not index the page. - Publish to Preview only, then share the preview URL for review.
Preview publishing is separate from production publishing. You do not need to publish to production to review the page, and a preview-only publish does not update the live site.
Restore an earlier version
Ploy saves versions of your site automatically as you work.
- Open your site in the editor.
- Select Versions in the preview toolbar.
On a phone, open the ⋯ menu in the preview toolbar and choose Version history.
- Choose the version you want and restore it. Ploy restores your site's code to that point in the editor.
- Check the preview, then select Publish to make the restored version live.
Restoring does not change your live site until you publish. To see when your site was last published, and by whom, open Publish: each target shows its last publish time and the member who published it. Publishes made by Ploy's Agent show the Ploy mark.
Custom Domains
By default, your site is available on a Ploy-hosted URL. To use your own domain:
- Go to Sites, select your site, then open Dashboard then Hosting.
- Free plans do not include custom domains. If your plan does not include them, or you have used all of yours, Ploy tells you why and what to do next. See Plan allowances in Custom Domain Setup.
- Click Add Domain and enter your domain.
- Click an existing Domain card to manage its Routing Rules
- Follow the setup flow — automatic (one-click via Entri) or manual DNS configuration.
- Ploy verifies DNS and provisions an SSL certificate automatically.
After you add the records at your registrar, come back to Sites, select your site, then open Hosting to finish the setup. DNS changes can take a while to propagate, so it is normal for a domain not to go live immediately. If you would like a hand with any of this, email support@ploy.ai.
For detailed instructions covering Cloudflare, Route 53, GoDaddy, Namecheap, Porkbun, and other registrars, see the full Custom Domain Setup guide.
SSL Certificates
Ploy automatically provisions and renews SSL certificates for every custom domain. No configuration needed — certificates are issued via ACME challenge as soon as your DNS records verify.
Your site is always served over HTTPS.
Going Live Checklist
Before sharing your site publicly, run through this checklist:
 Preview on desktop and mobile — Make sure the design looks good at all breakpoints.
- Check all links — Verify internal and external links work correctly.
- Review SEO basics — Page titles, meta descriptions, and Open Graph tags are set for key pages.
- Test page speed — Ask Ploy's Agent to run a Lighthouse audit.
- Set up analytics — Confirm your built-in analytics are tracking (they are by default), and connect GA4/GSC if desired.
- Configure your domain — Add a custom domain and verify SSL is active.
- Publish — Hit publish and verify the live site loads correctly.
What's Next?
- Connect a domain — Follow the Custom Domain Setup guide for step-by-step DNS instructions.
- Track performance — Set up Analytics to monitor traffic after launch.
- Troubleshoot — Check the FAQ & Troubleshooting page if you hit any issues.